Free Invoice Templates for Graphic Designers: Simplify Your Billing Process
Discover the best free invoice templates tailored for graphic designers. This comprehensive guide explores how to choose the right template, customize it for your brand, and use it to streamline your billing process. Learn the key features to look for, including fields for design services, rates, and payment terms. Whether you’re a freelance designer or running a small design studio, these templates will help you create professional, branded invoices that ensure you get paid on time. Includes FAQs and a sample invoice.
The Importance of Professional Invoicing for Graphic Designers
 Why You Need a Well-Designed Invoice
As a graphic designer, your work revolves around creativity and visual appeal. However, the business side of design—especially invoicing—can be challenging. A well-designed invoice not only ensures you get paid on time but also reflects your professionalism. A generic invoice may suffice, but a customized, branded invoice can make a lasting impression on your clients. In this article, we’ll explore free invoice templates specifically tailored for graphic designers, guiding you through choosing, customizing, and using them effectively.
Understanding the Basics of Invoice Templates
What Makes a Good Invoice Template for Graphic Designers?
Before diving into specific templates, it’s essential to understand what makes a good invoice template for graphic designers. Here are the key elements to look for:
- Design and Layout:
- Visual Appeal: As a designer, your invoice should reflect your design skills. Look for templates with clean, modern layouts that can be easily customized.
- Branding Opportunities: Ensure the template has space for your logo and brand colors. Consistency in branding across all client communications strengthens your professional image.
- Functionality:
- Clear Sections: A good invoice template will have clearly defined sections for your services, rates, client information, and payment details.
- Editable Fields: The template should allow you to easily edit text fields, add or remove sections, and adjust the layout to suit your needs.
- Ease of Use:
- User-Friendly: Choose templates that are easy to use and don’t require advanced software knowledge. Microsoft Word, Google Docs, and Excel are popular options.
- Compatibility: Ensure the template is compatible with the software you’re comfortable using.
Top Free Invoice Templates for Graphic Designers
Where to Find and Download the Best Templates
Now that you know what to look for, here are some of the best sources for free invoice templates designed specifically for graphic designers:
- Canva:
- Why Canva?: Canva offers a wide range of customizable invoice templates with a focus on design. You can easily add your branding and adjust the layout to suit your needs.
- Key Features: Drag-and-drop interface, extensive template library, and the ability to download in various formats (PDF, PNG, etc.).
- Microsoft Office Templates:
- Why Microsoft Office?: If you prefer working with Word or Excel, Microsoft Office provides free, professionally designed invoice templates that are easy to customize.
- Key Features: Editable fields, built-in formulas for Excel templates, and a familiar interface.
- Google Docs and Sheets:
- Why Google Workspace?: Google Docs and Sheets are excellent for those who prefer cloud-based solutions. They offer simple, clean invoice templates that are easy to share and collaborate on.
- Key Features: Real-time collaboration, easy sharing, and compatibility with various devices.
- Adobe Spark:
- Why Adobe Spark?: For designers who are already using Adobe products, Adobe Spark offers beautifully designed invoice templates that can be customized within the Adobe ecosystem.
- Key Features: Seamless integration with other Adobe tools, high-quality templates, and easy export options.
- Free Invoice Generator Websites:
- Examples: Websites like Invoice Ninja and Zoho Invoice offer free invoice templates specifically designed for freelancers and small businesses.
- Key Features: User-friendly interfaces, automated calculations, and cloud storage options.
Customizing Your Invoice Template
Personalizing Your Invoice for a Professional Touch
Once you’ve selected a template, the next step is customization. Here’s how to make your invoice stand out:
- Adding Your Branding:
- Logo: Place your logo prominently at the top of the invoice. This reinforces your brand and adds a professional touch.
- Color Scheme: Customize the color scheme to match your brand’s colors. This creates a cohesive look across all your client communications.
- Editing Text Fields:
- Business and Client Information: Replace placeholder text with your business details (name, address, contact information) and your client’s information.
- Service Description: Clearly describe the design services provided, including the scope of work, hours worked, and any other relevant details.
- Adjusting Fonts and Layout:
- Font Selection: Use fonts that align with your brand identity. Avoid overly decorative fonts that may distract from the content.
- Layout Adjustments: Rearrange sections if needed to make the invoice easier to read. Ensure that important information, like the total amount due and payment terms, is prominently displayed.
- Automating Calculations:
- Excel Formulas: If using an Excel template, utilize built-in formulas to automate calculations for subtotals, taxes, and the total amount due.
- Manual Calculations: If your template doesn’t support automated calculations, double-check your math to ensure accuracy.
Key Elements to Include in Your Invoice
Ensuring Your Invoice is Clear and Comprehensive
A well-structured invoice should include all the necessary information to ensure timely payment and avoid misunderstandings. Here’s what to include:
- Header Information:
- Your Business Name: Include your business name and logo at the top.
- Invoice Number: Assign a unique invoice number for easy tracking.
- Date of Issue: Clearly state the date the invoice is issued.
- Client Information:
- Client’s Name and Address: Include your client’s name, address, and contact details.
- Project Reference: Include a brief project description or reference to ensure the client knows what the invoice pertains to.
- Itemized List of Services:
- Service Description: List each service provided, along with a brief description.
- Hours Worked/Units: Include the number of hours worked or units delivered for each service.
- Rate: Specify your rate per hour or per unit.
- Subtotal: Calculate and display the subtotal for each service.
- Payment Details:
- Total Amount Due: Highlight the total amount due, including taxes and any additional fees.
- Payment Terms: Clearly state the payment terms, including the due date and accepted payment methods.
- Late Fees: If applicable, include information about late fees for overdue payments.
- Additional Notes:
- Thank You Message: Add a brief thank you message to express your appreciation for the client’s business.
- Special Instructions: Include any additional instructions, such as how to contact you with questions or where to send payments.
Best Practices for Sending Invoices
Ensuring Your Invoice Reaches the Client and Gets Paid on Time
Creating a professional invoice is only half the battle; you also need to ensure it reaches the client and gets paid on time. Here are some best practices:
- Choose the Right Format:
- PDF Format: Save your invoice as a PDF to preserve the layout and formatting. PDF files are also easy for clients to open and view.
- Digital Signatures: If required, use a digital signature to sign your invoice before sending it.
- Emailing the Invoice:
- Subject Line: Use a clear subject line, such as “Invoice # [Number] for [Project Name]” to avoid confusion.
- Email Body: Include a brief message in the email body summarizing the invoice and reiterating payment terms.
- Tracking and Follow-Up:
- Tracking Software: Use invoicing software or email tracking tools to monitor when the client opens the invoice.
- Polite Reminders: If the payment deadline passes, send a polite follow-up reminder. You can set up automated reminders with invoicing software.
- Organizing Your Invoices:
- Filing System: Keep a digital or physical filing system for all invoices. Organize them by client, date, or project to make future reference easier.
- Backup: Regularly back up your invoices to ensure you don’t lose important records.
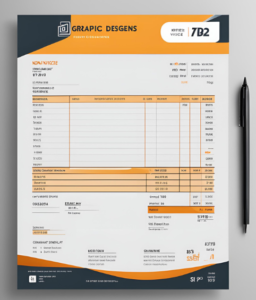
Sample Invoice Template for Graphic Designers
Example of a Customized Invoice Template
Below is a sample invoice that incorporates all the elements discussed in this article. You can use this as a reference when customizing your own template.
[Your Business Name]
[Your Address]
[City, State, Zip Code]
[Email Address]
[Phone Number]
[Website]
Invoice To:
[Client Name]
[Client Address]
[City, State, Zip Code]
[Client Email Address]
Invoice Number: 2023-001
Date of Issue: [Date]
Due Date: [Due Date]
Itemized List of Services:
| Service Description | Hours | Rate | Total |
|---|---|---|---|
| Logo Design | 5 hours | $75/hr | $375 |
| Website Banner Design | 3 hours | $70/hr | $210 |
Subtotal: $585
Tax (10%): $58.50
Total Amount Due: $643.50
Payment Terms: Payment is due within 14 days of the invoice date. Late payments will incur a 5% late fee. Accepted payment methods: Bank transfer, PayPal, Credit Card.
Thank you for your business!
Conclusion: Simplify Your Billing with Free Invoice Templates
Take Control of Your Freelance Business
Invoicing may not be the most glamorous part of being a graphic designer, but it’s a crucial aspect of running a successful business. By using the right free invoice templates, you can streamline your billing process, ensure timely payments, and maintain a professional image. Whether you’re just starting out or looking to refine your invoicing process, the tips and templates provided in this article will help you take control of your freelance business.
Frequently Asked Questions (FAQs)
Common Questions About Using Invoice Templates
- Can I use the same invoice template for multiple clients?
- Yes, just update the client details and service descriptions for each client.
- What software do I need to customize an invoice template?
- You can use software like Microsoft Word, Excel, Google Docs, or any graphic design software that supports text editing.
- Is it necessary to include taxes on my invoice?
- It depends on your local tax laws and whether your services are taxable. Check with a tax professional if you’re unsure.
- How can I make my invoice look more professional?
- Customize the template with your branding, use consistent fonts and colors, and ensure all information is clear and well-organized.
- Should I include a due date on my invoice?
- Yes, always include a due date to encourage timely payment.
- Can I send invoices digitally?
- Yes, you can send invoices as PDFs via email. Digital invoicing is faster and more convenient.
- What should I do if a client disputes an invoice?
- Communicate with the client to understand their concerns, provide any necessary clarifications, and be open to negotiation if needed.
- Can I charge late fees on my invoices?
- Yes, if you’ve outlined late fees in your payment terms, you can charge them for overdue payments.
- How do I track my invoices?
- Use invoicing software or maintain a spreadsheet to track which invoices have been paid and which are still outstanding.
- What should I do if a client hasn’t paid by the due date?
- Send a polite follow-up email and consider using invoicing software to automate reminders.
By following the advice and utilizing the free templates discussed in this article, graphic designers can simplify their invoicing process, ensuring they get paid promptly and maintain a professional image.
Related For Free Invoice Templates for Graphic Designers: Simplify Your Billing Process

How to Choose the Right Free Invoic
Choosing the right free invoice template for your business
How to Customize Free Invoice Templ
Learn how to customize free invoice templates in Microsoft
The Benefits of Using Free Invoice
Running a startup comes with a variety of challenges,